Karamba3Dの初期設定
21 November, 2015 - 5 min read - Tags: Karamba3D,構造とデジタル
Karamba3D の初期設定の変更法について説明します。
Karamba3D の初期設定は、karamba.ini というファイルに記述されています。データの場所は、デフォルトでは
"Rhino がインストールされているフォルダ \Plug-ins\Karamba\karamba.ini"となっていると思います。 編集はテキストエディタで行います。では開いて見ましょう。
開くと始めに以下のようなことが書かれていると思います。 ここから先は、内容を確認しながら何の設定なのかみていきます。
#---
# this is the karamba ini-file
#---
# written by Clemens Preisinger
# 15.08.2011
#---
# - comments start with '#' or ';'
# - string-formatting of numbers follows the C# formating conventions
#   here some examples:
#      just two decimal places
#          "{0:0.00}";    123.4567 -> "123.46"
#          "{0:0.00}";    123.4    -> "123.40"
#      max. two decimal places
#          "{0:0.##}";    123.4567 -> "123.46"
#          "{0:0.##}";    123.4    -> "123.4"
#          "{0:0.##}";    123.0    -> "123"
#      align numbers
#          "{0,10:0.0}";  123.4567 -> "     123.5"
#          "{0,-10:0.0}"; 123.4567 -> "123.5     "
#      ouput number in percent
#          "%";             0.1    -> "10%"
# - colors are named following the C# naming convention ()
# - for properties not found here default values will be chosen
# - strings need to be enclosed in '"'
# - values and property names are case-sensitive
#---
内容は、以下のようになっています。
- このファイルでは、文頭が”#”または”;”の行はコメント(読み込まない)行になる
- 数字のフォーマットは C#にならう
たとえば小数点以下 2 位ちょうどで表示したい場合
- "{0:0.00}"; 123.4567 -> "123.46"
- "{0:0.00}"; 123.4 -> "123.40"
最大で小数点以下 2 位としたい場合
- "{0:0.##}"; 123.4567 -> "123.46"
- "{0:0.##}"; 123.4 -> "123.4"
- "{0:0.##}"; 123.0 -> "123"#
結果の右揃えや左揃えにしたい場合
- "{0,10:0.0}"; 123.4567 -> " 123.5"
- "{0,-10:0.0}"; 123.4567 -> "123.5 "
パーセントで結果を表示する場合
- "%"; 0.1 -> "10%"
色は C#での名前にならう
ここで設定しなかったものは、プログラム上でのデフォルト設定になる
文字列は ” で囲われる必要がある
値や設定の名前は、大文字、小文字の区別がある
では次の段落へ
#---
# units to be used in Karamba. Do not mix Grasshopper definitions that
# use different units.
#---
UnitsSytem = "SI"
# UnitsSytem = "imperial"
これは単位系の設定です。
始めに、Karamba3D は Grasshopper とは単位が関連付けられているわけではないので注意しましょうとなっています。
その下の内容が単位の設定です。 現在私の設定では SI 単位系となっているため、UnitsSytem は”SI”のほうが選択されており、”imperial”はコメント行として読み込まれないようになっています。
では次の段落へ
#---
# default path of the license directory
# uncomment the entry by removing the '#' and set it to a custom value in case the default does not work for some reason
#---
# license_path = "C:\\Program Files (x86)\\Rhinoceros 4.0\\Plug-ins\\Grasshopper\\Karamba\\License"
ここは、Karamba3D のライセンスファイルの参照先についてです。 基本は直接参照されるので、コメント行になっている license_path はコメントのままにしておきます。 参照がうまくいかなかった場合に使用しましょう。
では次の段落へ
#---
# number format of the 'Legend T' output of the ModelView-component for
#    stresses, strains and utilization
#---
legend_stress_number_fmt = "{0,9:0.00e+00}"
legend_strain_number_fmt = "{0,9:0.00e+00}"
legend_utilization_number_fmt = "{0,9:0.0}%"
ここでは ModelView-componet の出力である Legend T の出力数値の形式を指定する箇所です。
最初の{0,9:は表示の文字の位置を調節します。 そのあとの部分は、stress(応力)と strain(ひずみ)は小数点以下2桁まで表示した指数表記、utilization(使用率)は小数点以下1桁まで表示するパーセント表記となっています。
では次の段落へ
#---
# number of colors for visualizing stresses, strains in positive and negative range
#---
legend_num_colors = 16
ここでは、応力とひずみの値を色のコンターで表示する際の、階調の色数を設定しています。 初期設定は 16 色となっています。
では次の段落へ
#---
# if true and zero lies in the range of results then the colour range will be centred on zero
#---
center_color_range_on_zero = true
ここでは先程に続き、出力時の色のコンターの中央値の設定です。
ブーリアン形式で記述し、true であれば最大値、最小値に関わらず色の中央が 0 となるように色の設定をします。 初期設定は true となっています。
余談ですが、なぜかここのカラーのつづりだけイギリス英語(colour)です。
では次の段落へ
#---
# coloring of legends
# color names can either be given by name or RGB value: (red, green, blue)
# the first color signifies values below the result range
# the last color signifies values above the result range
#---
legend_colors = yellow|red|white|blue|LimeGreen
resultant_disp_legend_colors = yellow|white|magenta|LimeGreen
thickness_legend_colors = Wheat|white|Gold|Plum
beam_stress_legend_colors = yellow|red|(255,255,255)|blue|LimeGreen
beam_utilization_legend_colors = yellow|red|white|blue|LimeGreen
shell_utilization_legend_colors = yellow|red|white|blue|LimeGreen
shell_sig1_legend_colors = yellow|red|white|blue|LimeGreen
shell_sig2_legend_colors = yellow|red|white|blue|LimeGreen
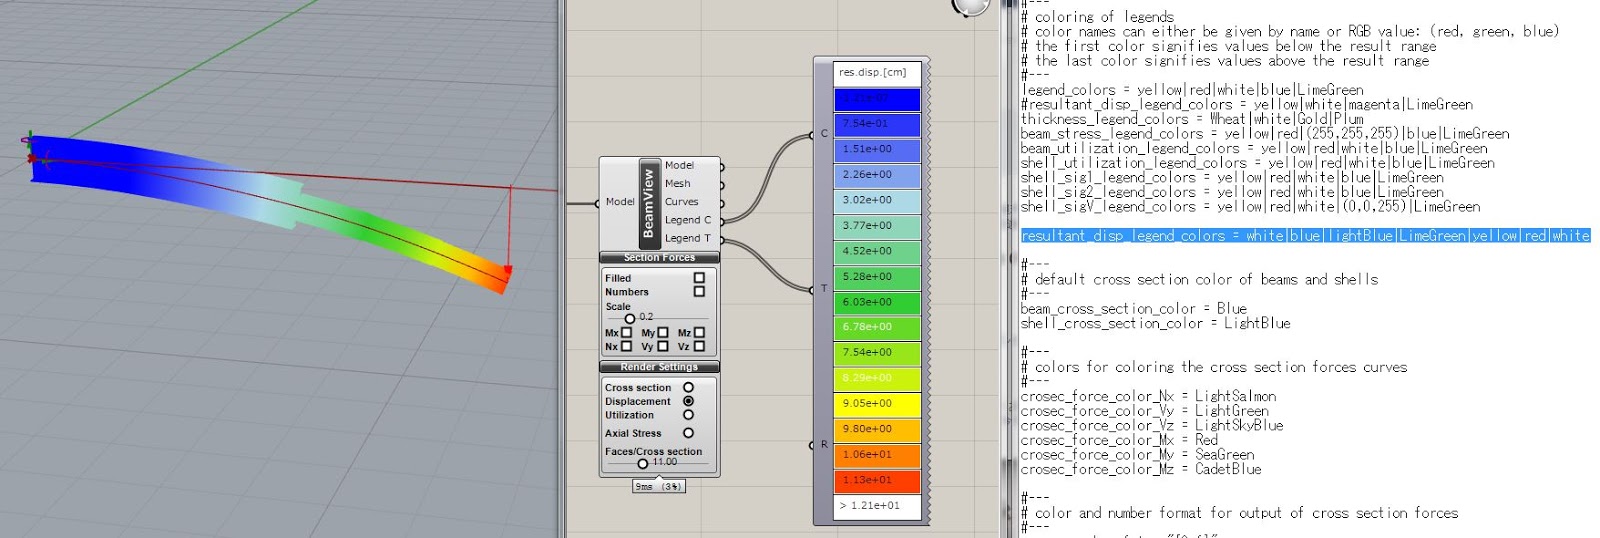
shell_sigV_legend_colors = yellow|red|white|(0,0,255)|LimeGreenここでは結果をコンターで表示する際の色を設定します。
色は、C#においてデフォルトで設定されている色の名前、または RGB(赤,緑,青)で設定することができます。 最初の色が一番下、最後の色が一番上となり、コンターには含まれない色になります。 コンター上で表示されるのは最初と最後の色を抜いた範囲で設定されます。
設定する色は表示順に
- 凡例のコンター
- 変位のコンター
- 板厚のコンター
- 梁要素の応力のコンター
- 梁要素の使用率のコンター
- シェル要素の使用率のコンター
- シェル要素の主応力1のコンター
- シェル要素の主応力2のコンター
- シェル要素の相当応力のコンター
となっています。例えば変位のコンターの箇所を
resultant_disp_legend_colors = white|blue|lightBlue|LimeGreen|yellow|red|white と変えると、下図のように Mi○as のようなコンターとすることができます。
私はこちらの色合いのほうがなじみがあるので、結果が見てわかりやすく安心感があります。また、上で述べたように、最初と最後に設定した色(ここでは White)がコンターに含まれていないこともわかります。
では次の段落へ
#---
# default cross section color of beams and shells
#---
beam_cross_section_color = Blue
shell_cross_section_color = LightBlue
ここではデフォルトの断面の色を設定します。
初期設定では、梁要素は青色、シェル要素は水色となっています。
では次の段落へ
#---
# colors for coloring the cross section forces curves
#---
crosec_force_color_Nx = LightSalmon
crosec_force_color_Vy = LightGreen
crosec_force_color_Vz = LightSkyBlue
crosec_force_color_Mx = Red
crosec_force_color_My = SeaGreen
crosec_force_color_Mz = CadetBlue
ここでは梁要素の断面力を図示する際の色の設定をします。
設定の順番は、以下です。
- 軸力 Nx
- せん断 Vy
- せん断 Vz
- ねじり Mx
- 曲げ My
- 曲げ Mz
では次の段落へ
#---
# color and number format for output of cross section forces
#---
crosec_number_fmt = "{0:f}"
crosec_number_color = "Black"
ここでは断面力の出力の値の数字のフォーマットと、色を設定しています。
初期設定は、値は小数点以下2桁までで黒色の文字で出力です。
では次の段落へ
#---
# text color, height and offset of element identifiers
#---
elemID_text_height = 20
elemID_text_offset = 20
elemID_text_color = "Black"
ここでは要素の ID を表示するときの文字の高さとオフセットする距離、色を設定します。
初期設定は高さ 20、オフセット 20、黒色となっています。
では次の段落へ
#---
# text height and offset of cross section names
#---
crosec_text_height = 20
crosec_text_offset =-20
crosec_text_color = "Black"
ここでは断面の名前を表示するときの文字の高さとオフセットする距離、色を設定します。
初期設定は高さ 20、オフセット-20、黒色となっています。
では次の段落へ
#---
# text height and offset of cross material names
#---
material_text_height = 20
material_text_offset =-20
material_text_color = "Black"
ここでは材料名を表示するときの文字の高さとオフセットする距離、色を設定します。
初期設定は高さ 20、オフセット-20、黒色となっています。
では次の段落へ
#---
# text height and offset of node tags
#---
node_text_height = 20
node_text_offset =-20
node_text_color = "Black"
ここでは節点のタグを表示するときの文字の高さとオフセットする距離、色を設定します。
初期設定は高さ 20、オフセット-20、黒色となっています。
では次の段落へ
#---
# text height and offset of NII values at elements
#---
NII_text_height = 20
NII_text_offset =-20
NII_text_color = "Black"
NII_number_fmt = "{0:f}"
ここでは AnalyzeTHⅡ で解析したときの結果を表示するときの文字の高さとオフセットする距離、色、数字のフォーマットを設定します。
初期設定は高さ 20、オフセット-20、黒色、小数点以下 2 位まで表示となっています。
では次の段落へ
#---
# maximum number of beam sections for mesh display
#---
maximum_ncrosec=500
ここではメッシュ表示するための梁要素断面の最大数を設定しています。
初期設定では 500 となっています。
では次の段落へ
#---
# factor for number of faces for rendering circular cross sections
#---
circular_cross_sections_n_faces_factor=6
ここでは円形の断面を表示するために、円を多角形に置換する際の多角形の角数を設定しています。
初期設定では、6 となっています。
では次の段落へ
#---
# maximum number of line segments per element when drawing stress- or force-flow-lines on meshes
#---
maximum_mesh_lines_per_element=500
ここではメッシュで応力や荷重や力の流れを線表示する際の線の最大分割数を設定しています。
初期設定では、500 となっています。
では次の段落へ
#---
# offset between symbols and annotations
#---
annotation_offset=20
ここでは符号と注記間の間隔を設定します。
初期設定では 20 となっています。
初期設定の項目は以上となります。
結構細かく設定できるようですね。 これらを変更して、自分の使いやすい Karamba3D としていきましょう。