Built with GitHub Actions
In this chapter, I’ll show you how to build components (plugins) that work with Grasshopper software using Github Actions. In short, you can build .NET Framework with Github Actions.
What’s GitHub Actions
Refer to GitHub Actions
GitHub Actions makes it easy to automate your entire software workflow in a world class CI/CD. Build, test, and deploy code directly from GitHub and make code review, branching, and issue triage work the way you want them to.
The ability to test and build using a virtual machine or container when you do a configured action such as a push or pull request to a GitHub repo.
Things to do
Build components and test functions using GitHub Actions and save it on GitHub when you do the following
- Push or pull requests to the develop branch
- Pull request to main branch
Because GitHub Actions are also available for the Windows environment, we will use Visual Studio to build it in the Windows environment.
Preparing on your PC
To develop the Grasshopper components, we will use Visual Studio 2019, and since it is hard to develop from scratch, we will download and use the development templates below.
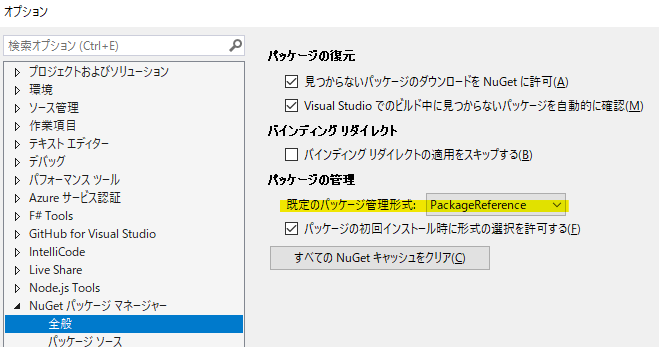
Using this template, references to RhinoCommon.dll, GH_IO.dll, etc., are localized; in the GitHub environment, of course, these dll files are not local because Rhino is not installed, so we used nuget to fix it. As a side note, the latest version of nuget for Rhino is for Rhino7; for Rhino6, use the version written in 6.xx.
The management format for nuget packages should be PackageReference, not Package.config.
How to set up GitHub Actions
GitHub Actions uses the YAML syntax to define events, jobs, and steps.
You can save this YAML file to a directory in your code repository called .github/workflows for actions. The file can be named anything.
The contents of the file are as follows We explain it in the comments out as appropriate. To summarize what we are doing, we are using MSBuild to build the target project file.
# The name of this workflow (used for example when making a badge)
name: Build Grasshopper Plugin

on:
  push: # Run when pushed to develop
    branches: [develop]
  pull_request: # Run when pull request to main and develop
    branches: [main, develop]

jobs:
  build:
    # Specify the latest environment for Windows in Github Actions
    # (now goes to Windows Server 2019 )
    runs-on: windows-latest # same as windows-2019

    steps:
      # Check out git and get the target repo in this environment
      - name: Checkout
        uses: actions/checkout@v2

      # Set up Vusial Studio (MSBuild)
      - name: Setup MSBuild.exe
        uses: microsoft/setup-msbuild@v1

      # Set up nuget
      - name: Setup NuGet
        uses: NuGet/setup-nuget@v1

      # Restore solution file
      # For example, to get the files referenced in nuget, etc.
      - name: Restore the application
        run: msbuild /t:Restore /p:Configuration=Release

      # Build
      - name: Build the application
        run: msbuild /p:Configuration=Release

      # Set up dotnet core for test
      - name: Setup .NET Core
        uses: actions/setup-dotnet@v1

      # Run Test
      - name: Run Test
        run: dotnet test GrasshopperCISampleTests\bin\Release\GrasshopperCISampleTests.dll

      # Upload files in the target path to GitHub
      - name: Upload build as artifact
        uses: actions/upload-artifact@v2
        with:
          name: GrasshopperComponent
          path: ./GrasshopperCISample/bin/GrasshopperCISample.gha
Confirmation
When you push the above file to the remote develop, Actions should start working. You can see it in action on GitHub by clicking on the Actions tab of the target repo - you’ll see an orange circle when Actions is running. If it’s done correctly you’ll see a green ㇾ mark, or if there’s an error and it stops, you’ll see a red cross.

If it works successfully, the build is uploaded as Artifact, as shown below, and you can download it by clicking on it.

The advantages of doing this
For example, let’s say you’re managing data to be released in your main branch, and when you push directly to your main branch, it’s up to you to make sure the data is buildable. To avoid this, we make sure that the CI configured here works when a pull request is made to the main branch. Even if the data is not working, it is checked by CI when it is pulled into the main branch, so the check is failed as shown below to prevent mistakes.
